
Instructions
SIM card settings
For the device to work, a micro SIM card 2G network must be inserted in the case of the Basic model and a nano SIM card 4G network in the Plus model, with data and calls.SIM CARD NOT INCLUDED
We recommend you to purchase the most economical option you can find as the clock needs little data, 100 Mb is enough. If you have any questions you can find it here.
1ºRemove the pin from the SIM, this operation can be done from any smartphone in the settings section. The smartwatch does not allow the pin to be entered by itself. You must remove the pin from the sim by inserting it into a smartphone or tablet and follow these steps:
Android system:
Access your Android settings and look for the “Security” option. Enter “SIM Lock”. Click on the “Lock SIM card” selector to remove the lock. The system will ask you to insert the card pin. It will be the last time you do it. Once this is done, the mobile will no longer ask you for the card pin every time you restart the smartphone.
IOS system:
First of all, we will go to the settings application. Once inside we navigate to mobile data in one of the first settings sections, under Bluetooth and WiFi. We find a menu of information about our operator, specifically there is a section called SIM PIN which is the one we are going to select. When we access it, it offers us two possibilities, the switch to activate / deactivate the SIM PIN or below a section to change PIN
2º Insert the SIM card
– With the chip facing up as the following image shows. The card must be inserted with the device switched off.
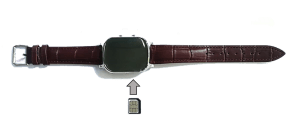
3º Close the SIM slot .
App registration
To configure and control the watch you need to download the SeTracker app available for Android and IOS for free.
Click “REGISTER” and create the account with a phone or email and enter a password. If it is the first time you link a device it is possible to do it from the registration page itself. Scan the RegCode QR code, it is on the watch label and you can also find it by turning on the watch and selecting RegCode.
If you want to link more than one Watchseniors with the application, you must:
Click on the “My” option in the main menu.
Access the list of devices.
Add device.
Select the square to scan the QR code.
When you have followed these steps, you must give a “nickname” to the device.
Translated with DeepL.com (free version)
first steps to take
Basic Model may needs you to configure the APN to connect to the Internet. This is done by sending an SMS from any cell phone to the watch number with the text : pw,1235456,apn,A.B,C,# .Where A stands for APN name,B user and C password.
Check with your phone company for A,B and C data.
The Plus model does not require these configurations
To configure the language, go to More / Settings and select “Language and time zone”. Inside choose the desired language.
To activate the GPS connection and get a more accurate location we recommend disabling the LBS option. To do this go to More/Settings/About device and deactivate LBS.
Regarding the S.O.S. configuration, you must access the settings and select “SOS Number” and enter up to 3 emergency phone numbers. The user will be able to call these three contacts sequentially by pressing the button enabled for this function.
For more information on specific functions visit our “Frequently Asked Questions” page.
Using the watch
Using Watchseniors is very simple for our seniors. Below we describe how to use the watch functions:


– To call a contact it is as simple as clicking once on the “Calls” button and the phonebook with the contacts entered in the app will appear. Once inside to scroll through the contacts you have to click again on “Calls” until the desired contact appears then click once on “ON/OFF” and the call will start.
– To use SOS, press and hold the “Calls” button for 3 seconds.
– To send a voice message, press and hold the “ON/OFF” button for 3 seconds.
– When we receive a voice message, it is as simple as pressing the “ON/OFF” button once to listen to it.